Day 7 - The Promise Of Docker Containers
Hey folks! My last post, titled How To Incorporate Containers Into Your Daily Duties, was all about how you can use containers to improve your work as a developer.
The problem with that is that it necessitates y’all knowing how to set up, configure, and run Docker containers.
I shouldn’t have assumed that everyone came to that post with the prerequisite knowledge, so here’s an article I wrote a little over a year and a half ago. It covers two things:
-
What benefits containers provide you, as a developer.
-
A demo/walkthrough of building an image based on a CentOS LAMP stack from scratch and spinning up a container to serve a web application.
I’ve also updated the additional resources at the end of this one so that they’re the current links/documents/installers as of July 31, 2019.
Hope you enjoy!
The Promise of Containers
As a web developer, I’m sure you’ve built a server or two. You probably spun up a Linux box and installed some packages like Apache, MySQL, or PHP. Maybe you pulled some of your code from GitHub, threw a database together, and edited some config files to bend the server to your liking.
(If you haven’t built a server and are interested in learning how, check out my LearnToProgram.TV course titled “Introduction to Server Administration”. - https://www.udemy.com/introduction-to-server-administration/)
But what happens if your server becomes corrupted, your backups have been failing without you noticing, or your site goes viral and traffic starts outpacing what your infrastructure can handle?
If you’re new to server administration, any of those events could seem daunting. If one occurred, you would have a bigger problem than manually rebuilding your server. You also have to hope that your documentation is thorough enough to cover every modification you made to your original system. You do have documentation, right?
Simply put, a disaster of any magnitude would make for a frustrating day or a late night. Disasters do happen and it’s prudent to be prepared for them. Let me introduce you to Docker, which is a container management system.
“But Henry, what in the world are containers and why should I care about them?”
Great question. Containers, in the context of software development, are best defined as segmented and sequestered user-space instances existing on top of a kernel.
“Yeah… can you make that simpler?”
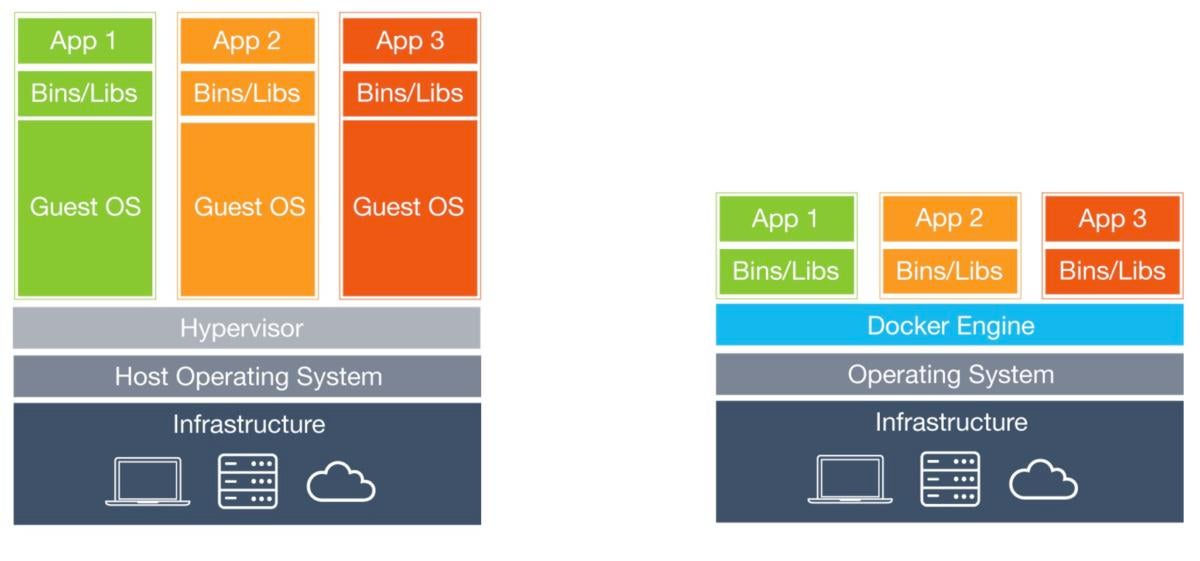
I sure can. The easiest way to explain containers is to compare them to virtual machines (VM’s). One method to run three different apps on one server is to run three different VM’s, which consist of an operating system, the app, and whatever dependencies that app needs in order to run. A container, in the context of this example, is a bundle of the bare minimum of code and dependencies it takes to run an application. Docker functions as the guest operating system for any number or type of containers. The obvious benefit is that it is much more resource-efficient than running several VM’s.
 Source: https://images.idgesg.net/images/article/2017/06/virtualmachines-vs-containers-100727624-large.jpg
“Word. This is starting to make sense. Paint me a word picture.”
You got it. Let’s dive in on how Docker (and containers in general) are going to take your game to another level. The benefits of using Docker are fiftyfold, but for the sake of brevity, I want to key in on the five which I believe are the most important.
1. Speed
The main key to wrap your head around is that Docker allows you to programmatically build out your infrastructure. That means instead of having to manually build another server every time you need a new one, you can just spin one up based on a predefined image of what you need the resulting container to be. It’s a little more time-intensive to build that image at the beginning of a new project, but every time you need to stand up a duplicate environment, it takes minutes instead of hours.
2. Ease of Use
In addition to speed, the ability to quickly spin up instances of infrastructure you need at any given moment can be a great boost to your organization. Let’s say the app you’re building hits the front page of Reddit and your traffic goes out of control. You could also get hacked and have your site knocked offline. Either way, you need to get back online quickly. Your business very well might depend on it. At least nine out of ten times, starting a container is faster than building a fresh server.
3. Security
A basic tenet of containers is that they are walled gardens. An initial benefit is that you can bundle apps with their respective dependencies so that if container A needs PHP5 and container B needs PHP7, that can be handled without having to worry about dependency clashes. The two containers may run side by side, but they won’t get in each other’s way.
The walled garden approach also means you can define exactly how you want and if you want data flowing in and out of a container. You’ll see in the demo that we explicitly tell our container to “EXPOSE 80”. That is saying it is okay to open up port 80 in the container to the broader system we’re running it on so that Apache can do its job and host content over that port. When you start building more complicated systems with Docker, you can use that kind of security to link certain containers running applications up to other specific containers holding databases or running some specific micro-services.
4. Portability
Since containers (in a simplistic view) are meant to be an app packaged with the bare minimum of resources it needs to run correctly, you can run that container on anything that can run Docker. Whether it is on Red Hat Enterprise Linux, your MacBook Pro, or Windows Server 2016, that container will spin up and function exactly as it should.
An added benefit is that you can develop in an environment that will eventually be your production environment. Your containers will be based on an image, which is a compiled list of instructions on how to build a specific environment. You can use that image to spin a container up on your laptop and build your app in it. When you’re ready to launch, you can use that same image to deploy a container on a public server and be completely confident that it’ll run the same there as it did locally.
5. Version Controllability
Finally, since Docker lets you build out your infrastructure as code, your infrastructure can be entered into version control system. One more time for the people in the back. YOUR INFRASTRUCTURE CAN NOW BE VERSION CONTROLLED. If you make a change and something breaks, just roll it back. If your data center somehow burns to the ground, you can pull your images and code from your remote repositories. Future you is going to thank present you for making their life that much easier.
Docker Demo
With all that said, let’s build our first container. I’m assuming that I’ve convinced you of Docker’s usefulness enough that you’ve already downloaded and installed it on your system. If you haven’t yet, please go do that now.
https://docs.docker.com/install/
Just for laughs, let’s say I need a basic site running on a CentOS server for a demo. There are two ways I can go about that: I can spend the twenty minutes it can take to create a new server from scratch, or I can use Docker to build one image that can then instantiate innumerable identical containers to run my site.
1 - Create a Dockerfile
First, make a new project directory and create a file named Dockerfile, which is a list of instructions on how to build a system on top of a base image. Base images can be based around languages like PHP, run-times like Node, or operating systems like Ubuntu. They are generally provided by the maintainers of the source product. That means they’re built by the creators of the software specifically to work well with Docker.
We then need instructions on how to build on top of that base. There are commands we can use, like: RUN, ADD, and CMD. They run shell level commands, map files from the host to a container and specify commands to run on boot, respectfully. We take the steps of configuring a server and translate them into tasks that Docker can use to automate the process.
It’s similar to how Git works behind the scenes, in that each commit (or instruction) is a set of changes to be made to the last commit, not the entire codebase at that moment.
For the sake of simplicity, we’re going to be building a very basic image. our Dockerfile will be as follows:
# Dockerfile
# Basic Setup

FROM centos:7
LABEL maintainer="henry@tld.com"

# Update repos and install httpd
RUN yum -y update && \
    yum -y install httpd && \
    yum clean all

# Expose a port from the container to Docker and run the startup script on launch
EXPOSE 80
CMD ["/usr/sbin/apachectl", "-DFOREGROUND"]
A Dockerfile reads surprisingly like English. All it is saying is that we want to use CENTOS y as a base, install Apache, expose port 80 to map to a different host port, and start-up Apache on boot.
2 - Build Your Image
Once the Dockerfile is saved, we’ll run a “build” command in the terminal/ This tells Docker (the utility) to use our Dockerfile (the list of instructions) to build a system.
First, we need to open our terminal and enter the directory that contains our Dockerfile. For me, that directory is ~hquinn/dev/forDevTo/TheFutureIsDocker/DockerDemo/.

We then need to tell the Docker utility to build the image being described by the Dockerfile.

The --rm denotes that we want to automatically delete the intermediate containers that are generated during the build process, the -t hquinn/dockerdemo is tagging our build with a name so we can more easily refer to it later, and the . at the end indicates that we want to run this command in the present working directory.
This command will log out every part of the build process to the console. It may take a few minutes, which is totally normal. Let it sit for a minute; it will tell you when it’s finished.
3 - Verify Your Image
Once Docker pulls down the base we chose to use (CentOS 7), installs Apache, and completes all other instructions, we’re given a finished image that is named based on the tag in the build command. You can see it (and the CentOS 7 base image) by listing the Docker images on your system.

4 - Spin Up A Container
Since the image is now built, we can use it to spawn a running container. We’re going to change directory to the project we want running on this first container and then run a docker run command.
(Here, I’m using a sample project from Dave Moran’s LTP course titled “Learn SASS and SCSS” - https://www.udemy.com/learn-sass-and-scss/)

This command is telling Docker to run a container-based on the image that we just build, but it was a few other parameters. The -d is telling Docker to run the container as daemon (in the background), the -p 80 is to map port 80 on the container to a port on the host, so it can be viewable via a browser, the --name Project1 is again a way to name the resource, and the --mount type=bind,source="$(pwd)"/app/,target=/var/www/html/ is telling Docker to map our local ./app/ directory to /var/www/html/ in the container so that Apache can host it for us.
5 - Verify Your Container
Now that the container is running with our code loaded into it, we can go see it in a browser. First, we need to figure out what local port the container’s exposed port got bound to.

We can see that the running container named Project1 has mapped our local port 32769 to port 80 on the container (the host port may be different on your machine). If we open a browser and head to localhost:32769, we can see our code running live.

6 - Drop Into Your Container’s Shell
That’s all there is to it. We could keep moving to different directories that have basic HTML/CSS/JS applications in a subdirectory called ./app/ and keep using that same command to spawn more containers. They’ll each spin up, map that code to /var/www/html/, and assign a port on localhost to each container.
We can verify that the container is pulling in our code by running a Docker command that grants us shell access to it. It’ll drop us right into the root of that CentOS system as the root user. If we look in the web directory, we can see that it pulled our files in and uses Apache to host them, the same way would on a traditional VPS.

7 - Clean Up
What demo would be complete without some file cleanup? If we keep spawning containers without doing any sort of maintenance, we will eventually hit the limits of our hardware. That’s not ideal. Let’s shut down and delete the container we spun up, then remove the image it’s based on.
Containers are ethereal. Once one is stopped with the docker stop command, we could spin it right back up, and it would be identical to the first time that we started it. To get rid of a stopped container, we’d run a docker rm command. To get rid of the image it was based on, we would run a docker rmi command.

Outro
Docker isn’t as insurmountable a technology as it seems. It can be tricky to wrap your head around, but once you do, it’s pretty easy to see the benefits that it can provide. Not only does it let you develop locally in the same environment you’ll use for production, but it lets you spin your infrastructure up and down to suit your needs: whether it’s scaling to meet viral demand or recovering from a disaster incident.
Furthermore, this is just a very small taste of what Docker can do. Your builds can be as simple or as complicated as you need. For instance, I have one build that consists of a group of three containers: one running a Node application, another container running PostgreSQL with data persistence through the help of a data volume, and the third acting as a query cache.
As a developer, Docker is an incredibly powerful tool to have in your arsenal. Honestly, even if it’s meant to solve a problem you haven’t had yet. You’ll eventually find yourself in a situation where Docker can save your bacon, and when you do, you’ll be ready for it. The documentation is incredible and it sounds corny, but the only real limit is your imagination. Now, get started building your infrastructure as code.
Additional Resources
- Article & Corresponding Code
- Docker Desktop Edition Installers
- Docker Getting Started Guide
- Docker Labs - Katacoda
- Dockerfile Documentation
Containers can be a hard subject to initially broach, since, from the outside, it can seem that there is just too much in that realm to learn. However, once you dig in, it’s just some light system administration work that’s being automated so you only have to put in a decent amount of effort the first time.
Hopefully, this post is enough to help at least one of you start your journey towards container enlightenment!
Also, the parts for my Raspberry Pi K8s bramble are all slowly coming in the mail. Just waiting on my cooling rack tomorrow afternoon. Can’t wait to start putting that together and creating some more content for you all.
Until then, stay frosty.